DVB-T with Linux
This blog is to document my experience in setting up Linux to view DVB-T channels in Singapore
Stage 1 - Install OpenSuSE
Install a Linux distro.
In my case, I installed OpenSuSE 10.1.
I will not walk through the OS installation steps, however, it is important to install development packages such as GCC compiler, kernel-source. Obviously, don't forget the DVB package although it is not very complete.
After getting the OS running, install the latest kernel and packages by doing an online software update.
Stage 2 - Compile driver
I'm using a Avermedia DVB-T USB 2.0 device. However the steps below may still apply to other devices.
Get the latest V4L-DVB drivers. Click on 'tree', then on 'gz' or 'bz2' to download the source code.
After downloading, 'un-tar' it to a temporary directory for compilation.
But before you can compile V4L-DVB, there are a couple of things to be done in OpenSuSE.
> su - # to change into root privileges.
> cd /usr/src/linux # if you have installed kernel-source packages, you would have the kernel sources here. Make sure the kernel source version match your running kernel version.
> make cloneconfig # create the kernel configuration
> make scripts
> make prepare # these 2 make commands are needed in OpenSuSE to prepare for module compilation
Now the kernel is ready for V4L-DVB compilation.
Go to the V4L-DVB and start compiling the application. The typical 'make' and 'make install' command will install the latest DVB module for your kernel.
If you encounter any issues at this stage more detailed info can be found here.
Next, get the firmware for your DVB device. They can be found at http://www.thadathil.net/dvb/fw/ or http://www.linuxtv.org/downloads/firmware/.
For my Avermedia device, I required http://thadathil.net:8000/dvb/fw/dvb-usb/dvb-usb-avertv-a800-02.fw.
This firmware file should be copied into /lib/firmware/ directory. It may be different for other Linux distro.
At this point, reboot your machine with your DVB-T device plugged in.
After bootup, you should see messages similar to these:
dvb_core: module not supported by Novell, setting U taint flag.
dvb_usb: module not supported by Novell, setting U taint flag.
hw_random hardware driver 1.0.0 loaded
dib3000_common: module not supported by Novell, setting U taint flag.
dib3000mc: module not supported by Novell, setting U taint flag.
dvb_usb_dibusb_common: module not supported by Novell, setting U taint flag.
dvb_usb_a800: module not supported by Novell, setting U taint flag.
dvb-usb: found a 'AVerMedia AverTV DVB-T USB 2.0 (A800)' in cold state, will try to load a firmware
dvb-usb: downloading firmware from file 'dvb-usb-avertv-a800-02.fw'
usbcore: registered new driver dvb_usb_a800
dvb-usb: AVerMedia AverTV DVB-T USB 2.0 (A800) successfully initialized and connected.
At this stage, your DVB device drivers are ready to be used by other applications.
Stage 3 - Tuning the DVB-T
If you have installed the DVB related packages, the applications used here should be available.
With root privileges,
> cd /usr/share/dvb/scan/dvb-t # These are where the country specific tuning parameters are stored. Unfortunately, there isn't one for Singapore.
So create the file named 'sg-Singapore' into the directory using vi or your favourite text editor with the following content:
# DVB-T Singapore
# T freq bw fec_hi fec_lo mod transmission-mode guard-interval hierarchy
T 538000000 8MHz AUTO AUTO AUTO AUTO AUTO AUTO # Digital 5,8 and CNA
T 602000000 8MHz AUTO AUTO AUTO AUTO AUTO AUTO # TVMobile
T 610000000 8MHz AUTO AUTO AUTO AUTO AUTO AUTO # HD Digital 5
Issue the following command to create the channel configuration.
> dvbscan sg-Singapore > channels.conf # This will scan and output the configuration into the file channels.conf
You should see the following messages displayed:
scanning sg-Singapore
using '/dev/dvb/adapter0/frontend0' and '/dev/dvb/adapter0/demux0'
initial transponder 538000000 0 9 9 6 2 4 4
initial transponder 602000000 0 9 9 6 2 4 4
initial transponder 610000000 0 9 9 6 2 4 4
>>> tune to: 538000000:INVERSION_AUTO:BANDWIDTH_8_MHZ:FEC_AUTO:FEC_AUTO:QAM_AUTO:TRANSMISSION_MODE_AUTO:GUARD_INTERVAL_AUTO:HIERARCHY_AUTO
Network Name 'Mediacorp DTV'
0x0000 0x0002: pmt_pid 0x0039 MediaCorp -- Digital 8 (running)
0x0000 0x0003: pmt_pid 0x003b MediaCorp -- Digital CNA (running)
0x0000 0x0004: pmt_pid 0x0048 MediaCorp -- Digital 5 (running)
0x0000 0x000a: pmt_pid 0x0033 (null) -- Demo (running)
>>> tune to: 602000000:INVERSION_AUTO:BANDWIDTH_8_MHZ:FEC_1_2:FEC_1_2:QPSK:TRANSMISSION_MODE_2K:GUARD_INTERVAL_1_4:HIERARCHY_NONE
0x0000 0x0001: pmt_pid 0x0400 MediaCorp -- TVMobile (running)
0x0000 0x0005: pmt_pid 0x0403 MediaCorp -- Tone (running)
0x0000 0x0040: pmt_pid 0x0000 MediaCorp -- DVBH Sig Ch (running)
0x0000 0x0041: pmt_pid 0x0000 MediaCorp -- DVBH IPDC Ch1 (running)
0x0000 0x0042: pmt_pid 0x0000 MediaCorp -- DVBH IPDC Ch2 (running)
Network Name 'TVMobile Network'
>>> tune to: 610000000:INVERSION_AUTO:BANDWIDTH_8_MHZ:FEC_2_3:FEC_1_2:QAM_64:TRANSMISSION_MODE_8K:GUARD_INTERVAL_1_8:HIERARCHY_NONE
0x0000 0x0008: pmt_pid 0x0049 (null) -- Mediacorp HD1 (running)
0x0000 0x000b: pmt_pid 0x0000 (null) -- Service 2 (running, scrambled)
0x0000 0x6640: pmt_pid 0x0000 (null) -- SysSoftwareUpdate (running)
Network Name 'mediacorp'
dumping lists (12 services)
Digital 5:538000000:INVERSION_AUTO:BANDWIDTH_8_MHZ:FEC_2_3:FEC_1_2:QAM_64:TRANSMISSION_MODE_8K:GUARD_INTERVAL_1_16:HIERARCHY_NONE:33:97:4
Digital 8:538000000:INVERSION_AUTO:BANDWIDTH_8_MHZ:FEC_2_3:FEC_1_2:QAM_64:TRANSMISSION_MODE_8K:GUARD_INTERVAL_1_16:HIERARCHY_NONE:34:98:2
Digital CNA:538000000:INVERSION_AUTO:BANDWIDTH_8_MHZ:FEC_2_3:FEC_1_2:QAM_64:TRANSMISSION_MODE_8K:GUARD_INTERVAL_1_16:HIERARCHY_NONE:35:99:3
Demo:538000000:INVERSION_AUTO:BANDWIDTH_8_MHZ:FEC_2_3:FEC_1_2:QAM_64:TRANSMISSION_MODE_8K:GUARD_INTERVAL_1_16:HIERARCHY_NONE:0:87:10
TVMobile:602000000:INVERSION_AUTO:BANDWIDTH_8_MHZ:FEC_1_2:FEC_1_2:QPSK:TRANSMISSION_MODE_8K:GUARD_INTERVAL_1_4:HIERARCHY_NONE:160:80:1
Tone:602000000:INVERSION_AUTO:BANDWIDTH_8_MHZ:FEC_1_2:FEC_1_2:QPSK:TRANSMISSION_MODE_8K:GUARD_INTERVAL_1_4:HIERARCHY_NONE:0:82:5
DVBH Sig Ch:602000000:INVERSION_AUTO:BANDWIDTH_8_MHZ:FEC_1_2:FEC_1_2:QPSK:TRANSMISSION_MODE_8K:GUARD_INTERVAL_1_4:HIERARCHY_NONE:0:0:64
DVBH IPDC Ch1:602000000:INVERSION_AUTO:BANDWIDTH_8_MHZ:FEC_1_2:FEC_1_2:QPSK:TRANSMISSION_MODE_8K:GUARD_INTERVAL_1_4:HIERARCHY_NONE:0:0:65
DVBH IPDC Ch2:602000000:INVERSION_AUTO:BANDWIDTH_8_MHZ:FEC_1_2:FEC_1_2:QPSK:TRANSMISSION_MODE_8K:GUARD_INTERVAL_1_4:HIERARCHY_NONE:0:0:66
Mediacorp HD1:610000000:INVERSION_AUTO:BANDWIDTH_8_MHZ:FEC_2_3:FEC_1_2:QAM_64:TRANSMISSION_MODE_8K:GUARD_INTERVAL_1_8:HIERARCHY_NONE:0:0:8
Service 2:610000000:INVERSION_AUTO:BANDWIDTH_8_MHZ:FEC_2_3:FEC_1_2:QAM_64:TRANSMISSION_MODE_8K:GUARD_INTERVAL_1_8:HIERARCHY_NONE:0:0:11
SysSoftwareUpdate:610000000:INVERSION_AUTO:BANDWIDTH_8_MHZ:FEC_2_3:FEC_1_2:QAM_64:TRANSMISSION_MODE_8K:GUARD_INTERVAL_1_8:HIERARCHY_NONE:0:0:26176
Done.
Important: If you are not able to get the above output, redo the dvbscan again. Another major factor is that your antenna is not in an ideal location to receive the signal. The best antenna location is for the antenna to be just outside the window (in good weather!!).
The channels.conf file will have the above 'dumping lists' content. Copy the file into this directory '/usr/share/dvb/zap/dvb-t/' with file name 'sg-Singapore'.
Stage 4 - Compiling the Viewer Application
Now, to compile the viewer application. There are several applications that support DVB viewing such as xine and mplayer. The viewing application that comes with OpenSuSE is not quite complete, so my advice is to get the latest source and install it.
First stop, download xine-lib from http://xinehq.de/index.php/home. The current version is xine-lib 1.1.2.
In order to compile it as a RPM, you have to convert from a bz2 into gz. This is what I did:
> bunzip2 -d xine-lib-1.1.2.tar.bz2 # To uncompress bz
> gzip xine-lib-1.1.2.tar # To recompress as gz
> rpmbuild -tb xine-lib-1.1.2.tar.gz # To build the xine-lib as RPM
Successful compilation will give you 2 files in the directory '/usr/src/packages/RPMS/i586/'.
The 2 files are 'libxine1-1.1.2-0.i586.rpm' and 'libxine1-devel-1.1.2-0.i586.rpm'.
If you already have xine-lib and xine-ui from the OpenSuSE packages installed, you have to remove them using 'rpm --force --nodeps -e xine-lib'
Install the new libxine1 by issuing 'rpm -ivh libxine1-1.1.2-0.i586.rpm'
The next step is to compile a GUI for xine-lib. I use xine-ui. You can get the current version here http://prdownloads.sourceforge.net/xine/xine-ui-0.99.4.tar.gz.
To compile it as a RPM, the 'Copyright' field in the spec file has to be modified to 'License'.
> tar xvfz xine-ui-0.99.4.tar.gz # to un-tar
Apply the following patch to the spec file:
--- xine-ui-0.99.4/misc/xine-ui.spec 2005-07-27 02:38:15.000000000 +0800
+++ xine-ui-0.99.4.new/misc/xine-ui.spec 2006-08-03 19:46:02.000000000 +0800
@@ -16,7 +16,7 @@
Summary(cs): Voln audio a video pehr�a�Summary(de): Ein freies Audio- und Video-Abspielprogramm
Version: %{version}
Release: %{release}
-Copyright: GPL
+License: GPL
Group: Applications/Multimedia
Source: http://xinehq.de/files/%{name}-%{version}.tar.gz
URL: http://xinehq.de
diff -Nur xine-ui-0.99.4/misc/xine-ui.spec.in xine-ui-0.99.4.new/misc/xine-ui.spec.in
--- xine-ui-0.99.4/misc/xine-ui.spec.in 2005-02-08 05:04:29.000000000 +0800
+++ xine-ui-0.99.4.new/misc/xine-ui.spec.in 2006-08-03 19:44:07.000000000 +0800
@@ -16,7 +16,6 @@
Summary(cs): Voln audio a video pehr�a�Summary(de): Ein freies Audio- und Video-Abspielprogramm
Version: %{version}
Release: %{release}
-Copyright: GPL
Group: Applications/Multimedia
Source: http://xinehq.de/files/%{name}-%{version}.tar.gz
URL: http://xinehq.de
Recompress the directory and follow the same procedure to compile as RPM.
> tar cvfz xine-ui-0.99.4.tar.gz xine-ui-0.99.4 # to create the tar compress file
> rpmbuild -tb xine-ui-0.99.4.tar.gz # To build RPM
Next install the 'xine-ui-0.99.4-1.i586.rpm' in the '/usr/src/packages/RPMS/i586' directory.
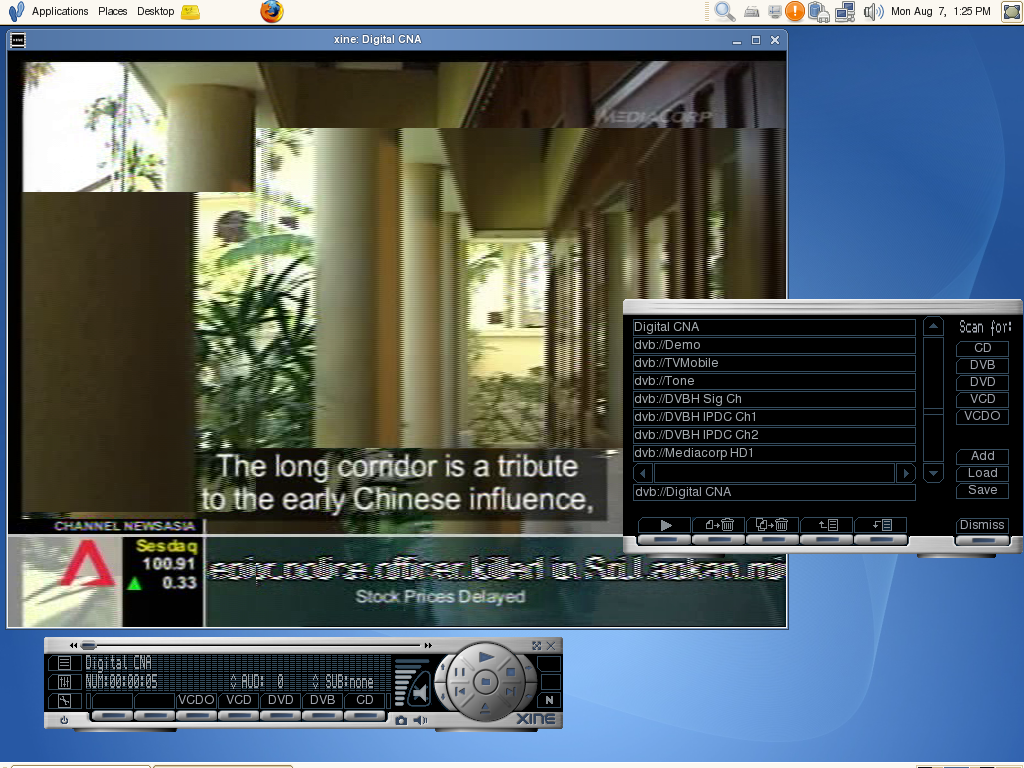
Stage 5 - Viewing the DVB channels
Congratulations on reaching the final stage.
Copy the channels.conf file created in Stage 3 and put it into your xine configuration home directory '~/.xine/'
Start up your xine application.
Right click to show controls (if it is not already shown).
Click on 'DVB' button.
It will start showing the first channel. If you click on the 'Playlist' button, it will show you the channels in the channels.conf file.
Unfortunately, the HDTV channel is not supported at this moment. I think there is an issue with the H.264 decoder compatibility.
posted by e4elid @ 12:00 AM
1 comments
![]()

1 Comments:
Excellent blog! Thank you!
Post a Comment
<< Home